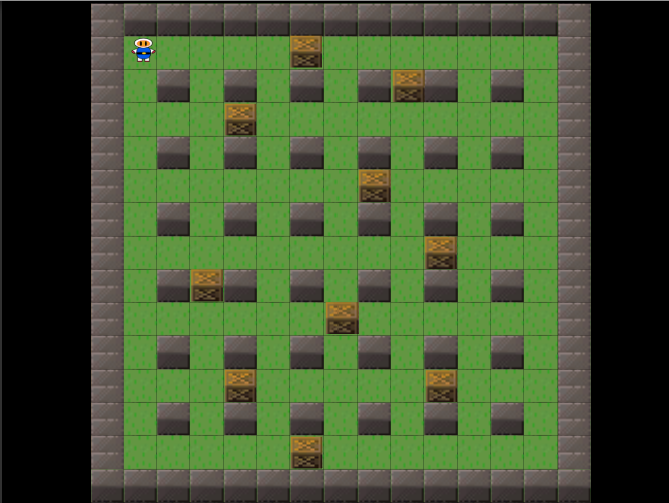
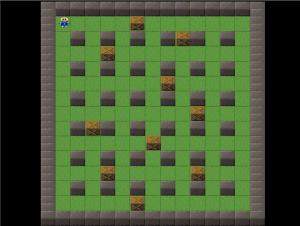
In this tutorial series we are going to build a multiplayer Bomberman game. Our game will have a title scene, which will allow the players to create or join games. Also, it will have a battle scene, where the players will fight each other in a competitive mode.
In this first tutorial we will build the basic infrastructure for our game, such as the Title and Battle scenes, as well as adding the player in our game. In the next ones we are going to keep adding features to it.
In order to follow this tutorial, you are expected to be familiar with the following concepts:
- C# programming
- Basic Unity concepts, such as importing assets, creating prefabs and adding components
- Basic Tiled map creation, such as adding a tileset and creating tile layers
Before starting reading the tutorial, create a new Unity project and import all sprites available through the source code.
Did you come across any errors in this tutorial? Please let us know by completing this form and we’ll look into it!

FINAL DAYS: Unlock coding courses in Unity, Godot, Unreal, Python and more.
Table of contents
Assets copyright
The assets used in this tutorial were created by Cem Kalyoncu/cemkalyoncu and Matt Hackett/richtaur and made available by “usr_share” through the creative commons license, wich allows commercial use under attribution. You can download them in http://opengameart.org/content/bomb-party-the-complete-set or by downloading the source code.
Source code files
You can download the tutorial source code files here.
Slicing spritesheets
Once you have imported the sprites from the source code, you will notice that some of those sprites are simply images, while others are spritesheets. The images are already good to be used, but we need to slice the spritesheets into frames.
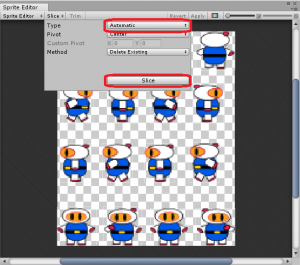
The way we do that is by selecting the spritesheet in the editor, then changing its Sprite Mode to multiple. Then we can click in the Sprite Editor button to slice it.
Once you have opened the Sprite Editor window, the slice button will show the slice options. Usually, we can slice them using the Automatic Type and hitting the Slice button, which will find the best separation for each frame. You can use this slice Type for the bomb and player spritesheets.
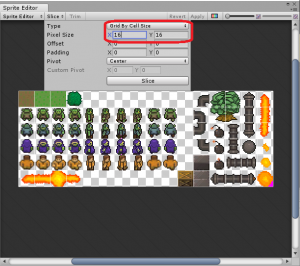
However, for slicing the tileset, selecting the Automatic Type doesn’t work, because some of the tiles are too close, and are too similar too each other. So we are going to select the Grid By Cell Size Type. The cell size for this tileset is 16×16. Finally, we hit the Slice button.
Now that we have configured all our game sprites, we can start building the game scenes, starting by the Title Scene.
Title scene
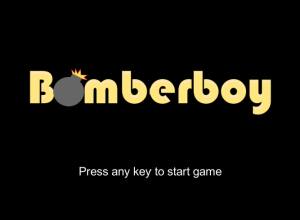
In this tutorial, the Title Scene will be very simple. It will simply show the game title, and a message to start the game. Then, we are going to add a script to start the game when the player presses any key. In order to show the game title and the message, we are going to need to create a Canvas.
Title canvas
A Canvas in Unity is a object where you can put your UI elements, such as texts, images and buttons. In order to create a canvas, simply right-click on the objects hierarchy, then go to UI->Canvas. We are going to call this object TitleCanvas.
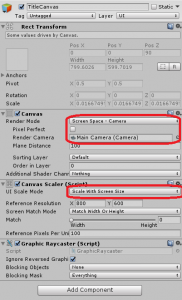
We need to configure some properties in the Canvas object. First, we are going to set the Render Mode to Screen Space – Camera, and we are going to select our Main Camera as the Render Camera. Also, we are going to change the UI Scale Mode to Scale With Screen Size, so that our canvas behaves well as the game screen size changes.
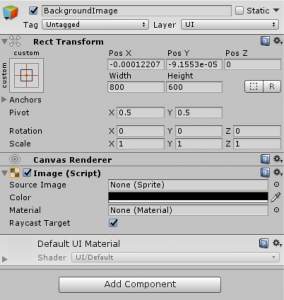
Now that we have our canvas, we are going to add its elements. First, let’s add a BackgroundImage, but adding a new Image as a child of the Canvas (UI->Image). We are not going to select any source image for the background, but we are going to set its color as black.
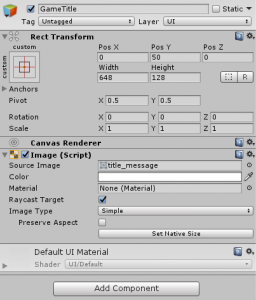
The second child of the BackgroundCanvas will be another image, but this one will be called GameTitle. The game title will be an image from our sprites folder, so select it as the Source Image of the GameTitle object.
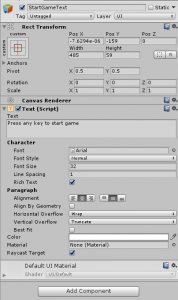
Finally, we are going to add a Text as child of the Canvas (UI->Text), which will be called StartGameText. In this object we need to set its text content and font properties. The figure below shows the settings I used, but you can choose the ones that look better in your game.
Now that we have all the objects in our Title Scene, we only need to add an event to start the game when the player presses any key.
Start game
We are going to start the game using a very simple script, as below.
We only need to implement the Update method of this script and, in this method we check if any key has been pressed (Input.anyKey is true). If so, we load a scene called Battle. However, in order to call this LoadScene method, you need to use the SceneManagement namespace in your script, so remember to do that.
using System.Collections;
using System.Collections.Generic;
using UnityEngine;
using UnityEngine.SceneManagement;

public class StartGame : MonoBehaviour {

	void Update () {
		if (Input.anyKey) {
			SceneManager.LoadScene ("Battle");
		}
	}
}
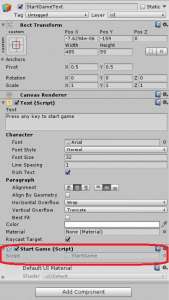
After creating the script, we add it to the StartGameText object.
However, if you try running the game it will still not open the next scene. In order to do so, we need to:
- Create a new scene called Battle
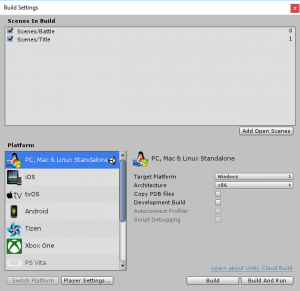
- Add both scenes (Title and Battle) in the Build list of our game
The first thing is easy. Simply create a new empty scene and call it Battle. Now, for the second thing we need to go to File->Build Settings. Then, then you can drag and drop both scenes to the Scenes in Build part of the Build Settings window.
By now, you should be able to run the Title Scene and start the game.
Our next step will be to create the Battle Scene.
Battle scene
The Battle scene will be where all the gameplay happens. Player will be able to move through the scene dropping bombs. Each bomb will explode after some time, creating explosions. Explosions can destroy blocks, but not walls. If an explosion hits a player, the player dies. Also, if an explosion hits a bomb, it makes the bomb to instantly explode.
The first thing we need to do in our Battle Scene, is creating our battle map.
Creating and importing the Tiled map
We are going to create a Tiled map for our Battle Scene. In order to do that, we are going to use the Tiled map editor.
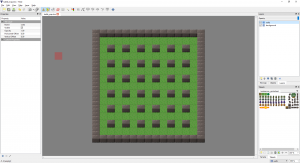
Since building maps in Tiled is not the objective of this tutorial, I’m not going to explain the details of how to build our battle map using it. So, feel free to use the map provided in the source code (shown below) or to create your own. However, if you create your own map, you should be careful with two things:
- I’m only adding tile layers for the background and for the walls. Other objects, such as the player and blocks will be added later in Unity.
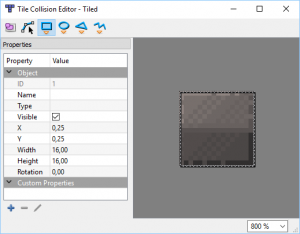
- In order to properly have colliders for the walls, we need to configure some tile colliders accordingly. You can do this by selecting the tiles that should be collidable (for example the wall tiles) and selecting Tile->Tile Collision Editor. This will open a window like the one below, where you can configure the collision area of the tile.
After creating the map, you can save it using the Tiled map format and add it to a Maps folder in your Unity project.
However, we can’t simply open this map in Unity. We are going to need another tool to convert it to a Unity object, so that we can add it in our game.
We are going to use the Tiled2Unity tool for that. This tool receives as input a Tiled map and creates a Unity object in your game representing the map. In this process it also creates the colliders for tiles when necessary.
After installing Tiled2Unity you will find two important files in its installation folder: the Tiled2Unity executable file and the Tiled2Unity Unity package.
First, open the Tiled2Unity Unity package, so that it will be imported in your Unity project. This will create a Tiled2Unity folder in your Assets folder, with a Tiled2Unity.export file inside of it (among many other files and folders). This file will be important later to import your map.
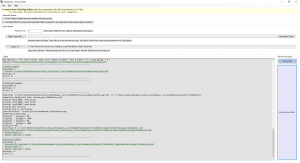
Now, open the Tiled2Unity executable file. This will open a window like the one below, where you can select your map to import to Unity. The Export To location is the Tiled2Unity.export file mentioned earlier.
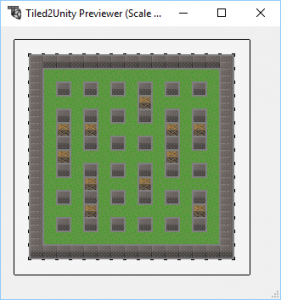
You can also preview your map before exporting. This should show the colliders of the walls.
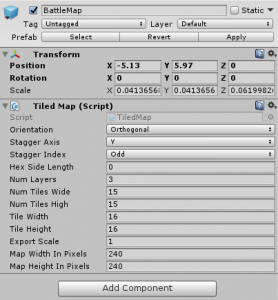
After you export your map to Unity, it will create a prefab for it in the Tiled2Unity/Prefabs folder. Then, you can add this prefab to your game. However, you will need to change its scale, since it will be too big for the game screen, as it is.
And with that we have finished importing our Tiled map in our Unity project. Now, we are going to add other objects to our Battle Scene. Starting with blocks, which will be exploded with the bombs.
Adding blocks
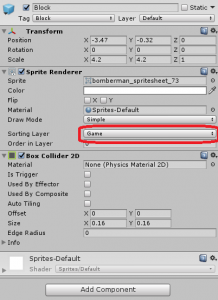
Let’s start by creating a prefab for the block. The block will simply have a Sprite Renderer and a Box Collider. The sprite will be one from the tileset. However, notice that we are setting the Sorting Layer of the Sprite Renderer as Game. This is a custom layer you need to create, so that the blocks appear above the map.
Then, we are going to add an empty object as child of the BattleMap. This empty object will be called blocks, and it will group all the blocks.
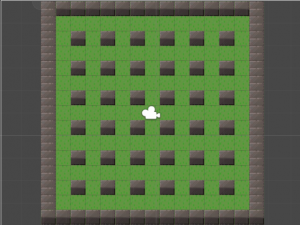
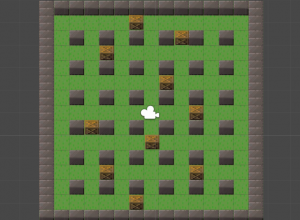
Now, we can add Block prefabs in our game, and make them children of the blocks object. You can put the blocks whenere you wish (the figure below shows an example). However, be aware that you need to properly set the block scale, so that it appears in a reasonable size.
Now that we have the walls and the blocks, we are going to create the Player object of our game.
Moving the player
The first thing we need to do is creating a Player prefab, and allowing it to navigate through the map.
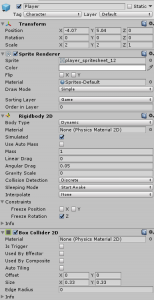
So, create a new Prefab called Player with a Sprite Renderer, a Rigidbody 2D (so that we can control its velocity), and a Box Collider 2D (to check for collisions). Also, you will need to adjust its scale, so that it has a reasonable size in our battle map.
Now, we are going to create a new Script called Player Movement as below. The script gets the movement axis (horizontal and vertical) in order to determine the player velocity in both directions. The way the player moves is as follows: the player can move to a given direction (for example, to the left), if it is not already moving to the opposite direction (to the right).
So, the first condition in the script checks if the player velocity is less than or equal to zero (which means the player is not moving to the right). If so, we can change its velocity in the X axis to make it move left. We do the same for all directions. In the end, we set the player object velocity.
public class PlayerMovement : MonoBehaviour {

	[SerializeField]
	private float speed;

	void FixedUpdate () {
		float moveHorizontal = Input.GetAxis ("Horizontal");
		float moveVertical = Input.GetAxis ("Vertical");

		Vector2 currentVelocity = gameObject.GetComponent<Rigidbody2D> ().velocity;

		float newVelocityX = 0f;
		if (moveHorizontal < 0 && currentVelocity.x <= 0) {
			newVelocityX = -speed;
		} else if (moveHorizontal > 0 && currentVelocity.x >= 0) {
			newVelocityX = speed;
		}

		float newVelocityY = 0f;
		if (moveVertical < 0 && currentVelocity.y <= 0) {
			newVelocityY = -speed;
		} else if (moveVertical > 0 && currentVelocity.y >= 0) {
			newVelocityY = speed;
		}

		gameObject.GetComponent<Rigidbody2D> ().velocity = new Vector2 (newVelocityX, newVelocityY);
	}
}
Now, we add this script to the Player prefab, and if you try playing the game now, you can already move the player. However, it is still not playing its walking animations. So, our next step will be to add the player animations and their transitions.
Animating the player
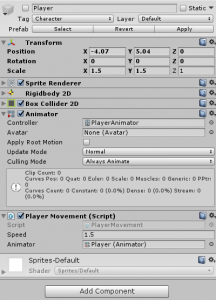
In order to add animations in Unity, the first thing we need to do is creating an Animator Controller. What I’m going to do is creating a new folder in Assets/Animations/Player and then I’m going to create a new Animator Controller called PlayerAnimator (you can create the Animator by clicking on Create->Animator Controller). Then, we can add this Animator to the Player prefab.
Now we are going to create the Player animations. The Player will have eight animations: four idle animations (one for each direction) and four walking animations (one for each direction).
Once you have created all Animations (you don’t need to set the animation frames yet), we are going to add them to the PlayerAnimator. So, with the Player prefab selected, open the Animator editor in Unity. This will show the Animator state machine. Then, drag and drop the animations to the Animator. Now, if you switch to the Animation editor, you can set the frames for each animation. This will create a state for each animation.
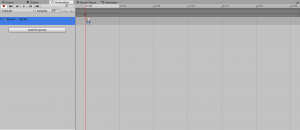
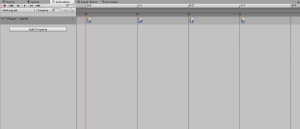
The idle animations will only show the player standing in a given direction, so they will have only one frame. The walking animations will have the frames for that walking movement. The figures below show the examples for the IdleLeft and WalkingLeft animations. You can create the other ones in a similar way. However, notice that you need to properly set the number of Samples in the animations.
We want an animation to play when the player is moving to that direction, so the Animator state will be controlled by the PlayerMovement script. We can control an animator by adding parameters to the Animator (in the Parameters tab of the Animator editor). We are going to add two parameters: DirectionX and DirectionY. Each parameter will be an integer between -1 and 1, and will tell to the Animator if the player is moving to a given direction. For example, if the DirectionX parameter is equals to 1, the player should transition to the WalkingRight animation.
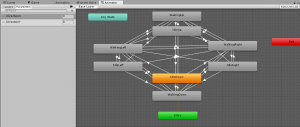
Now we need to create the transitions between animations using the parameters. There will be three types of transitions:
- If the Player is stopped and starts moving to any direction, it should start playing the animation of that direction. So, we need transitions between each Idle state to each Walking state. The parameters of the transition will depend on the direction the player is moving to.
- If the Player is moving in a given direction, and both DirectionX and DirectionY parameters become 0, it should go back to an IdleState. The correct idle state depends on the current walking animation. For example, if the current animation is WalkingLeft, it will go back to the IdleLeft state.
- If the Player is moving in a given direction, and the DirectionX or DirectionY parameters change, it should go to a different walking animation. For example, if the current animation is WalkingLeft, but eventually DirectionX become 0 and DirectionY become 1, it should transition to the WalkingUp animation.
Adding all those transition rules, the PlayerAnimator should look like this in the end:
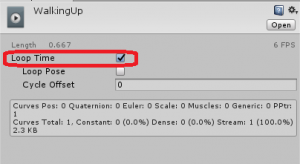
However, there are still some details we need to fix in our animations. First, the walking animations should loop when they end. So, select those animations, and check the Loop Time box.
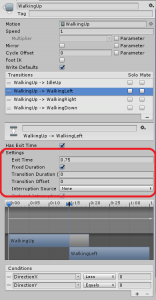
Also, in order to have more smooth transitions between the animations, we are going to set the delay between them to 0. We can do that by selecting a transition, then checking the Has Exit Time and Fixed Duration boxes and setting the Transition Duration to 0.
Finally, we need to set the DirectionX and DirectionY parameters in the PlayerMovement script. This will be done as shown below. Once we set the velocity in a given direction, we update the DirectionX or DirectionY parameter accordingly. If the player is not moving in a given axis, we set its direction parameter to 0.
public class PlayerMovement : MonoBehaviour {

	[SerializeField]
	private float speed;

	[SerializeField]
	private Animator animator;

	void FixedUpdate () {
		float moveHorizontal = Input.GetAxis ("Horizontal");
		float moveVertical = Input.GetAxis ("Vertical");

		Vector2 currentVelocity = gameObject.GetComponent<Rigidbody2D> ().velocity;

		float newVelocityX = 0f;
		if (moveHorizontal < 0 && currentVelocity.x <= 0) {
			newVelocityX = -speed;
			animator.SetInteger ("DirectionX", -1);
		} else if (moveHorizontal > 0 && currentVelocity.x >= 0) {
			newVelocityX = speed;
			animator.SetInteger ("DirectionX", 1);
		} else {
			animator.SetInteger ("DirectionX", 0);
		}

		float newVelocityY = 0f;
		if (moveVertical < 0 && currentVelocity.y <= 0) {
			newVelocityY = -speed;
			animator.SetInteger ("DirectionY", -1);
		} else if (moveVertical > 0 && currentVelocity.y >= 0) {
			newVelocityY = speed;
			animator.SetInteger ("DirectionY", 1);
		} else {
			animator.SetInteger ("DirectionY", 0);
		}

		gameObject.GetComponent<Rigidbody2D> ().velocity = new Vector2 (newVelocityX, newVelocityY);
	}
}
By now, you can try playing the game and moving the player. Check if all animations are playing correctly, and if the player is correctly colliding with the walls.
And this concludes this part of this tutorial series. In the next part we are going to allow the player to drop bombs, as well as making the bombs to explode and destroy blocks in the game.
