During this three part tutorial series we will be creating a complete Hyper Casual Android game. The term “hyper casual” is a relatively new term used for simple but addictive games that have minimal art and bright colors. If you have been paying attention to the app stores, you will see many hyper casual games topping the charts.
The first part of the tutorial will cover the project, the player, and camera setup. We will be creating the sprites for this game right inside the Unity Editor, and will be adjusting the project settings so that they match what is needed for an Android platform mobile game playable in portrait 480 x 800 resolution.
To ensure that you will be able to effectively follow along with this tutorial you should be comfortable with:
- C# programming language
- Unity editor
- Vector2 and Vector3
- Creating folders, creating prefabs, adding and attaching scripts to game objects, adding components such as rigidbodies, scene creation, renaming scenes and game objects, creating tags, and adding colliders to gameobjects.
- Understanding of the differences between Update, FixedUpdate, and LateUpdate functions.
- Unity Remote 5 (For testing our Android game on a mobile device)
Table of contents
Source Code Files
You can download the tutorial source code files here. All the project files are located in the main folder. The asset folder contains additional intermediate files that were used during the process of creating the game sprites.
Before proceeding any further with this tutorial go ahead and make sure you are using Unity version 2018.2.13f1. You may use an older version of Unity, but you may notice differences between the version used in this tutorial and your version, and it may make it difficult to follow along effectively. Go ahead and create a new 2d project, you can name the project whatever you like. Switch the platform build settings to Android, generally Unity will default to windows build settings on a new project.
Did you come across any errors in this tutorial? Please let us know by completing this form and we’ll look into it! FINAL DAYS: Unlock coding courses in Unity, Godot, Unreal, Python and more.
Folder Setup and Scene Creation
Create 3 new folders under assets in the project tab, name them: Sprites, Scripts, and Scenes (Alternatively, you may name them what you wish, but it’s common practice for good organization to keep naming conventions simple and obvious so that you know right where to navigate when looking for something in your projects). If you are using Unity version 2018.2.13f1, you may have noticed that there is already a folder in the assets section of the project tab named scenes. Unity now creates this folder and a scene called “Sample Scene” with any new project that is created. Go ahead and rename the scene name to “Game.” Save the scene and project.
Camera Setup
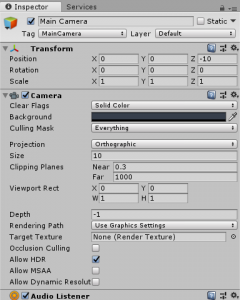
In the Hierarchy tab select Main Camera and in the inspector tab change the following: Background color to a black or grey color, set the projection to Orthographic (Top down view), and the size to 10.
We will be writing some code later on in this tutorial series where we will change the background color so that it changes during game play. So, the initial color of the background really isn’t that important right now.
Player Sprite Creation and Setup
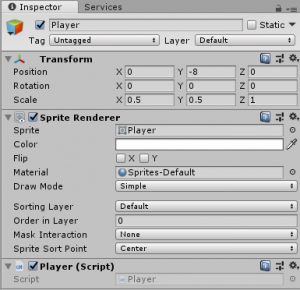
Navigate to the Sprites folder we have already created and right click, select create>Sprites>Circle. This circle will represent our player. Go ahead and drag the circle player into Hierarchy tab, and rename it to “Player.” There are a few settings in the inspector we need to adjust to finish up the initial player setup in the game scene. In the Inspector window on the transform component adjust the Y position to -8 and change the scale in the X and Y to 0.5. You can leave the Sprite color at white for now. Add a new script to the player object in the inspector and name it “Player.” This script will control all the behavior of our player.
The Player Script
Open the Player script up in your code editor, this tutorial uses Visual Studio. We need to add some movement behavior to our player. Go ahead and create a function called “PlayerMovement.” Create a FixedUpdate function under the Update function that is already in the script. We will be calling the “PlayerMovement” function in FixedUpdate. We also need to create a float variable called angle and set its initial value to 0 and create an int variable named xSpeed and set the initial value to 3.. We will add the following code to control the player movement on the X axis and also control the angle of the player as it moves. Essentially we will end up with the player moving back and forth on the X axis(Horizontally), you can go ahead and save the script and go back into the Unity Editor and hit play and make sure everything is working as intended. Later on we will be controlling the player movement by touch, so that the player will move upwards at an angle depending on where the player touches the game screen on the mobile device. Save the scene and project.
 float angle = 0;
 int xSpeed = 3;

 private void FixedUpdate()
    {

        PlayerMovement();

    }

    void PlayerMovement()
    {

        Vector2 pos = transform.position;
        pos.x = Mathf.Cos(angle) * 5;

        transform.position = pos;
        angle += Time.deltaTime * xSpeed;
    }
Now we will create the “PlayerInput” function. Create this function right under the Player Movement function. This function will get the players touch input and then move our player(the circle) on screen upwards as long as the player touches the screen. So as long as the player holds their finger on the game screen on the mobile device the player object will move upwards. We also need to create a variable called ySpeed and set its initial value to 30. We need to add force to our rigidboody2D in order to get the player to move upwards as the screen is touched. We will need to create a variable for our Rigidbody2D component and name it PlayerRigi. Since our player object will soon have a rigidbody2d attached to it, and we will be moving the player object via the rigibody we need to create the variable and then get reference for it in the “Awake” function. You can create the “Awake” function right below are variable declarations.
  Rigidbody2D PlayerRigi;

    float angle = 0;

    int xSpeed = 3;

    int ySpeed = 30;

    void Awake()
    {
        PlayerRigi = GetComponent<Rigidbody2D>();
    }


    private void FixedUpdate()
    {
        PlayerInput();
        PlayerMovement();

    }

    void PlayerMovement()
    {

        Vector2 pos = transform.position;
        pos.x = Mathf.Cos(angle) * 5;

        transform.position = pos;
        angle += Time.deltaTime * xSpeed;
    }

    void PlayerInput()
    {
        if (Input.GetMouseButton(0))
        {

            PlayerRigi.AddForce(new Vector2(0, ySpeed));
        }
        else
        {
            if(PlayerRigi.velocity.y > 0)
            {
                PlayerRigi.AddForce(new Vector2(0, -ySpeed));
            }
            else
            {
                PlayerRigi.velocity = new Vector2(PlayerRigi.velocity.x, 0);
            }

        }
    }
Save this script. Go back into the Unity Editor and test out our new code to make sure the player does indeed move upwards as the left mouse button is held down. Please note that if you test on your PC you will be holding the left mouse button down, but if you hook your mobile device to the Unity Editor via the Unity Remote 5 to test that way you will hold your finger on the screen to get the player to move upwards, and the player object should continue to move upwards as you hold your finger down or press the left mouse button down.
Create and Attach a Trail Renderer to Our Player
Now that we have are player game object moving and responding to the player’s input we are going to create and attach a trail renderer component to the player. This trail renderer will kind of give the player game object a wave looking sort of effect behind it as it moves along in the game scene.
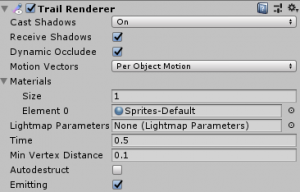
Click on the player object in the Hierarchy tab and click Add Component and in the search bar type trail renderer. Choose the trail renderer component. You will adjust the following settings on the trail renderer component in the inspector window: Materials, click the arrow beside it, and change the element 0 section to sprites-Default. Adjust the time to 0.5.
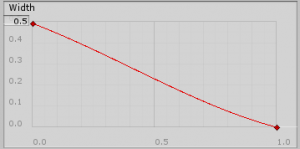
Now click on the width input box and change the value to 0.5. And using the mouse drag the red diamonds downwards to make it look like the screenshot below.
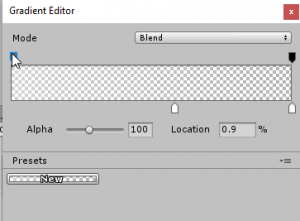
Now we are going to adjust the color and alpha settings of the trail renderer, so click on the color component on the trail renderer component in the inspector window, and another window will pop up called the Gradient Editor.
You will now click on the tab in the upper right hand corner of the gradient editor. Change the Location percentage to 58.2% and the Alpha to 0. Click on the grey tab in the upper left hand corner of the Gradient Editor and adjust the Alpha Setting to 100.
Now go ahead and hit the play button in the Unity Editor and test out our new spiffy trail renderer.
Setting Up the Camera to Follow Our Player
We now need to get our camera to constantly follow the player as they are moving. This Hyper Casual Game wouldn’t be complete if the player couldn’t see where they were going to avoid the obstacles we will be creating shortly. In order to not make this game so difficult, we need to include a Y offset on the camera so that the player can see a little bit ahead of themselves as they play to sort of “ready” themselves and be able to move at the right moment to avoid the obstacles ahead.
Click on the Main Camera in the Hierarchy tab, and add a new script component and name it “CamFollow.” Open the script up, and we will begin to write the code we need to get this camera following our player correctly.
We need to declare two variables: The first is the Transform of the player, you can call it playerTransform and the second is for the offset, make this a public float (So we can access it in the inspector) and call it “offset.”
 private Transform playerTransform;
 public float offset;
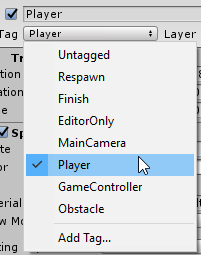
We now need to create a tag for our Player and tag the Player because we are going to get reference to the Transform of the player in the start function. Remember, tags are case sensitive in Unity so make sure you type it correctly.
Once you have the Player Game Object tagged as Player, go ahead and get reference to the player transform in the start function; we are going to use the FindGameObjectWithTag(“Player”) to do so in the Start function(Be mindful here that you do type FindGameObjectWithTag and not FindGameObjectsWithTag, we have only one Player in our scene).
    private void Start()
    {
        playerTransform = GameObject.FindGameObjectWithTag("Player").transform;
    }
Now we need to create a “LateUpdate” function below the Start function. Why are we using LateUpdate, you may ask? Since we are moving the Player in FixedUpdate (FixedUpdate is called every fixed frame rate) on the Player script we are using LateUpdate so that we don’t get “jerky” camera movement, and since LateUpdate is called after FixedUpdate and that’s where the player movement is being handled, the player’s movement is already calculated so that we have more precise data on where to move our camera to follow the player more accurately.
Inside the LateUpdate function the current camera’s position needs to be stored in a temporary variable, call it Vector3 temp and set it to equal transform.position. This script is attached to our camera so we need to get the camera’s transform.position. Then we need to set the camera’s Y position to equal the player’s Y position. Then add the offset value to the temporary camera Y position. Then set the camera’s temporary position to the camera’s current position.
 private void LateUpdate()
    {
        Vector3 temp = transform.position;

        temp.y = playerTransform.position.y;

        temp.y += offset;

        transform.position = temp;
    }
Save the script, and go test out the functionality in the Unity Editor by hitting the play button. You should see that our camera in the scene is now smoothly following our player as the game object moves upwards. If you click on the camera object in the Hierarchy you can watch the value in the transform component go up as the camera follows the player object.
As of right now we have our player moving, the camera following our player smoothly, player input is being taken in, and the player game object has a spiffy little trail renderer following behind it as it moves. This is a three part tutorial series, in part two we will tackle the first obstacles the player will need to avoid, we will handle collision of the obstacles and the player, keeping score and displaying it, and we will work on the game manager.
