BabylonJS Series by David Catuhe (@DeltaKosh):
- Part 1 – Build a 3D Sphere with WebGL
- Part 2 – 3D Elements with HTML5 and WebGL
- Part 3 – Rotating and Scaling 3D Objects in HTML5
- Part 4 – 3D Objects with Textures using HTML5
- Part 5 – Using a Camera in a 3D WebGL World
- Part 6 – Light in a 3D WebGL World
- Part 7 – How to Animate 3D Object with WebGL
Table of contents
Learn WebGL and Babylon.js at your own pace
Feel free to check out our online course 3D Programming with WebGL and Babylon.js for Beginners on Zenva Academy. The course covers the Babylon.js framework and explains all you need to get started with using this fantastic library in new or existing projects.
Tutorial
In this tutorial, we are going to learn how to create basic elements using Babylon JS such as boxes, spheres, and planes.

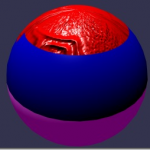
Final result
How can I do this ?
Creating an object is easy, but as far as we build our scene, the code will become more and more complex, so let’s see our new structure. We keep an HTML5 page, but the JavaScript code will be exported in a new .JS file, to clarify our code. So the entire web page is now shorter, but with 2 new JS file:
        html,body,#canvas {
            width:100%;
            height:100%;
            padding:0;
            margin:0;
            overflow: hidden;
        }
mainTutos.js file
The first one contain all about Babylon mechanics: loading engine, testing WebGL support, scaling the scene to browser size, and obviously loading our scene and rendering it! This file won’t change a lot in the future as we now have all basic functions in it.
Here is the result of “mainTutos.js”:
window.onload = function(){
    var canvas = document.getElementById("canvas");

    // Check support
    if (!BABYLON.Engine.isSupported()) {
        window.alert('Browser not supported');
    } else {
        // Babylon
        var engine = new BABYLON.Engine(canvas, true);

        //Creating scene (in "scene_tuto.js")
        scene = createSceneTuto(engine);

        scene.activeCamera.attachControl(canvas);

        // Once the scene is loaded, just register a render loop to render it
        engine.runRenderLoop(function () {
            scene.render();
        });

        // Resize
        window.addEventListener("resize", function () {
            engine.resize();
        });
    }
};
Scene_tuto.js file
This file is all about our scene. It is about to become our main JS file, where we are going to create all our objects so keep an eye on this file! As we saw in our previous JS file, we are loading a function named “createSceneTuto” to render the scene, so let’s see what’s inside.
As we have learned in the previous tutorial, first, we are creating a basic scene (scene object, camera, light):
function createSceneTuto(engine) {
    //Creation of the scene
    var scene = new BABYLON.Scene(engine);

    //Adding of the light on the scene
    var light = new BABYLON.PointLight("Omni", new BABYLON.Vector3(0, 100, 100), scene);

    //Adding of the Arc Rotate Camera
    var camera = new BABYLON.ArcRotateCamera("Camera", 0, 0.8, 100, new BABYLON.Vector3.Zero(), scene);
Now you can add all the meshes you want! Have a look on basic elements you can create:
- Create a box
var box = BABYLON.Mesh.CreateBox("Box", 6.0, scene);Parameters are: name, size of the box, the scene to attach the mesh.
- Create a sphere
var sphere = BABYLON.Mesh.CreateSphere("Sphere", 10.0, 10.0, scene);Parameters are: name, number of segments (highly detailed or not), size, scene to attach the mesh. Beware to adapt the number of segments to the size of your mesh ;)
- Create a plane
var plan = BABYLON.Mesh.CreatePlane("Plane", 50.0, scene);Parameters are: name, size, and scene to attach the mesh.
- Create a cylinder
var cylinder = BABYLON.Mesh.CreateCylinder("cylinder", 3, 3, 6, scene, false);Parameters are: name, height, diameter, tessellation (highly detailed or not), scene, updatable.
- Create a torus
var torus = BABYLON.Mesh.CreateTorus("torus", 5, 1, 10, scene, false);Parameters are: name, diameter, thickness, tessellation (highly detailed or not), scene, updatable.
Now you have a scene with 5 new objects in it, but the default position of meshes is vector zero (x=0, y=0, z=0), so how can you move them? Simply by giving them a new 3D point, a “Vector3” (Look at this video for a vector tutorial). So if you want to move your box:
box.position = new BABYLON.Vector3(-10,0,0);
sphere.position = new BABYLON.Vector3(-10,30,0);
plan.position = new BABYLON.Vector3(30,5,0);
cylinder.position = new BABYLON.Vector3(-30,0,5);
torus.position = new BABYLON.Vector3(-10,0,-30);
Finally, when the scene is ready, return the scene object to the first JS file to complete the creation of our scene:
return scene;
}
And that’s it!
Grab the files
You can grab the tutorial files here.