Since the dominance of mobile games in the industry, no genre is more popular than the idle clicker.
In this tutorial, we’re going to use the well-established Phaser 2 framework – which offers cross-platform capabilities – to build an idle clicker game where you “attack” monsters to progress in the game. Of course, we’ll also set up the ability to buy auto-clickers that will “attack” monsters for you as well.
If you’re ready to explore this in-demand genre, let’s learn!
Table of contents
What is an idle click game?
Also known as clicker and incremental games, these type of games have you clicking something repeatedly or idling to gain some form of currency (e.g. cookies, money, energy) which you then use to buy upgrades. It’s a very simple concept at the core, but quite addictive!
Clicker games were first made popular in 2013 with a game called Cookie Clicker. Since then many games have been created in this genre, the themes and flavor of these games vary widely. From cookies to fantasy rpg, sci fi, farming, sand castles, etc.
One such clicker game that I’ve played quite a bit is Clicker Heroes, it’s a fantasy RPG style game where you click various monsters to progress. In this tutorial, we are going to build the foundations of a clicker game similar to Clicker Heroes that you can build upon and add your own style and flair.

Tutorial source code
You can download the tutorial source code here.
Did you come across any errors in this tutorial? Please let us know by completing this form and we’ll look into it!

FINAL DAYS: Unlock coding courses in Unity, Godot, Unreal, Python and more.
Getting started
Source Control
The first thing that I do when starting any project is create a folder, and initialize it for git source control. If you don’t already have git, you can download it for your OS from the official site. With any software development, it is critical to have backups. Using source control, specifically git, is a much more robust and safe solution than simply copying or zipping your files periodically. It’s also important to do micro commits, save your progress in very small increments so that you can roll back to any point if you find that you’ve added some new code that is breaking everything. Also it prepares your codebase automatically for upload to a service like github or bitbucket. There are many things beyond simply committing your code that you can do with git, if you are new to git I encourage you to checkout the Git and Github Fundamentals course at Zenva Academy.
After installing git for your system, open the folder you created in a command window, and simply type git init and it will be ready to go.
Gathering Art
We need to get some sprites for the monsters. A great site to find free art that you can use for your projects is OpenGameArt.org. Much of the artwork is either public domain or licensed to the Creative Commons. A quick search and I’ve found a resource with a variety of monster sprites. This particular set is licensed under CC BY SA 3.0 which basically means that you must give credit to the original authors, and any modifications you make must be shared under the same license. There are other licensing options available to artists, and some do not allow the use of the resources in commercial applications, so be sure to check the licensing on the site.

The monster images that I’ve chosen come in various sizes, each with 4 frames representing various damage states. For this game, we don’t really need the extra damage states, so I have cropped all of the images to just the first frame. For the purposes of this tutorial, I think that 1 image per monster is all that we’ll need. It would be nice if these monsters were animated, but the single image works well for a placeholder right now.
In addition to the monsters, we’ll need some rpg icons for the upgrades and loot. It’s not likely that we’ll use all 496 images in this set, but we can prune the collection later before we are ready to release of the ones that we don’t use. We’ll also need something to use as a background for our world, this forest scene will do nicely.
You’ll find all of the sprites in the assets/images folder of the companion source code to this project. If you’re downloading your own selection of images to use, place them in there as well.
Reminder: Once you’ve added your files, go ahead and commit them to source control.
Setup Phaser
You’ll need to download Phaser, you can either clone the github repo or download the release or use something like Bower to install it. Phaser games are web based games, so first we need a HTML page to host it. Create a file called index.html in the root of your project folder and put this for the contents.
<!doctype html>
<html>
    <head>
        <meta charset="utf-8">
        <title>Click of the Titans</title>
        <style>body {margin: 0;padding: 0;}</style>

        <script src="lib/phaser.min.js"></script>

        <script src="src/game.js"></script>
    </head>
    <body>

    </body>
</html>
Reminder: micro commits, commit your index.html file right now!
You may have noticed that we added a reference to game.js located in the src folder. We don’t have that file yet, let’s create it now.
var game = new Phaser.Game(800, 600, Phaser.AUTO, '');

game.state.add('play', {
    preload: function() {
        game.load.image('skeleton', 'assets/allacrost_enemy_sprites/skeleton.png');
    },
    create: function() {
        var skeletonSprite = game.add.sprite(450, 290, 'skeleton');
        skeletonSprite.anchor.setTo(0.5, 0.5);
    },
    render: function() {
        game.debug.text('Adventure Awaits!', 250, 290);
    }
});

game.state.start('play');
In Phaser, everything starts with an instance of the Game class. We are passing it the width and height of the game screen that we want as well as the renderer. Phaser supports both Canvas and WebGL based rendering, Phaser.AUTO tells it to pick based on what’s available in the browser (WebGL if available).
In the preload phase of our “play” game state we are going to load up one of our monster images so that we can have something to show other than a blank screen. Each state in Phaser has several phases in its lifecycle, and preload is one of the first.
Next up is create , after assets are loaded, it’s safe to create sprites using them. The Sprite is one of the main game objects in Phaser, most everything that you create in the game world will generally have a sprite involved. Adding a sprite takes a few parameters: the x & y coordinates of where it should be located on the screen, and a key that can be used to reference it later. We’re also going to change the anchor for the sprite to the center of the image. The anchor is the point in space where the sprite is positioned or rotated around. By default the anchor is set to the top left most point of the image 0, 0 I ususally like to work with the anchor in the center of the image, because if I want to spin the sprite, I want it to spin around the center instead of the top left (like a wheel).
Finally, render is one of the last phases in the lifecycle, it happens after update (we don’t need update for this game). Most of the time Phaser handles rendering internally, but for now we’ll just add some fun text to make our screen more exciting.
Reminder: now’s a great time to commit your file!
Running your game
We’re almost ready to fire up Phaser and see what we have, except that it’s not just as simple as clicking on index.html and loading it in your browser. Due to security restrictions the browser will not allow you to load assets asynchronously. For that reason you need to run a server, or load the files in a different manner. PhotonStorm has posted an article listing several options for servers, however if loading the software to run a server isn’t something that you are interested in, I have another option. If you are running Google Chrome, you can actually setup your game to run as a Chrome application quite easily. Doing this elevates your game out of the browser sandbox (and actually gives you a set of APIs to access native systems such as the file system and networking) and these restrictions no longer apply. There are however a different set of security restrictions involving resources located outside of the files packaged with the app. Depending on how you want to distribute your final product, creating a Chrome app may be a great choice. I’ll include the basic files needed to launch this as a Chrome App, if you are interested in learning more I encourage you to read more at the official documentation.
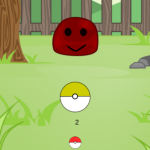
Once you launch your game, you should see this:

Now you know that Phaser is up and running. We’ve loaded a sprite and written a bit of text to the screen! We’re almost done :) … well not quite, but we’re ready to start actually making a game.
Setting the Stage
The first thing that we want to do is get rid of that boring black background and bring our world to life. In the preload method, add all of the images that make up the forest background. There happen to be four different images for this because it is designed to be used as a parallax scrolling background. Typically this type of background is used in side scrolling platformer games, but it gives us the option of doing an animation effect later.
this.game.load.image('forest-back', 'assets/parallax_forest_pack/layers/parallax-forest-back-trees.png');
this.game.load.image('forest-lights', 'assets/parallax_forest_pack/layers/parallax-forest-lights.png');
this.game.load.image('forest-middle', 'assets/parallax_forest_pack/layers/parallax-forest-middle-trees.png');
this.game.load.image('forest-front', 'assets/parallax_forest_pack/layers/parallax-forest-front-trees.png');
In the create method since we have 4 different images that make up the background, we’ll create a Group of TileSprite objects. Using a javascript array of the image keys, we can use the built in forEach method to quickly and elegantly create all four in the correct order.
var state = this;

this.background = this.game.add.group();
// setup each of our background layers to take the full screen
['forest-back', 'forest-lights', 'forest-middle', 'forest-front']
    .forEach(function(image) {
        var bg = state.game.add.tileSprite(0, 0, state.game.world.width,
            state.game.world.height, image, '', state.background);
        bg.tileScale.setTo(4,4);
    });
A TileSprite is a type of image that is meant to be repeated or tiled over a large area. To create one you need to pass it not only the x & y coordinates, but also a width and height for how big the area that it needs to cover should be. Just like the Sprite, you give it the image key to use. The final parameter that we pass it is our group, so that each one is automatically added to the background group. We want the background to cover the whole screen, so we’ll pass in the game world’s width and height. Also, in this case, our image isn’t really meant to be tiled like a mosaic, so we’ll scale the tiling so that it looks more like one image (play with the scale numbers to see what I mean about the tiling).
Let’s take a moment to talk about the group that we created. Groups are an extremely powerful feature of Phaser that are capable of a whole lot more than just the name suggests. At the very base level, they act as a collection, sort of like an array, and they have several methods available for traversing and manipulating the items in the collection. Another important aspect of groups is that the children of the group are positioned, rotated, and scaled all relative to the group itself. If we set group.x = 10; then it will move all of the children over by 10 as well. The position of the children is relative meaning that if a child item also has it’s x coord set to 10, then it will actually be placed at x 20 on the screen (assuming that the group itself is not a child of another parent that isn’t at 0,0). We will use groups extensively in our game and I encourage you to read the documentation to find out more about all of the methods and properties that are available.
Reminder: time to commit your files!
The Army of Darkness
After setting the stage, the next thing we need is something to attack. Time to unleash the horde of monsters that we’ve collected. In order to be able to use all of our monsters, we need to load each image. Let’s change the preload section of our play state to do just that. Each one needs a key to reference it by, and the path to the image file.
    this.game.load.image('aerocephal', 'assets/allacrost_enemy_sprites/aerocephal.png');
    this.game.load.image('arcana_drake', 'assets/allacrost_enemy_sprites/arcana_drake.png');
    this.game.load.image('aurum-drakueli', 'assets/allacrost_enemy_sprites/aurum-drakueli.png');
    this.game.load.image('bat', 'assets/allacrost_enemy_sprites/bat.png');
    this.game.load.image('daemarbora', 'assets/allacrost_enemy_sprites/daemarbora.png');
    this.game.load.image('deceleon', 'assets/allacrost_enemy_sprites/deceleon.png');
    this.game.load.image('demonic_essence', 'assets/allacrost_enemy_sprites/demonic_essence.png');
    this.game.load.image('dune_crawler', 'assets/allacrost_enemy_sprites/dune_crawler.png');
    this.game.load.image('green_slime', 'assets/allacrost_enemy_sprites/green_slime.png');
    this.game.load.image('nagaruda', 'assets/allacrost_enemy_sprites/nagaruda.png');
    this.game.load.image('rat', 'assets/allacrost_enemy_sprites/rat.png');
    this.game.load.image('scorpion', 'assets/allacrost_enemy_sprites/scorpion.png');
    this.game.load.image('skeleton', 'assets/allacrost_enemy_sprites/skeleton.png');
    this.game.load.image('snake', 'assets/allacrost_enemy_sprites/snake.png');
    this.game.load.image('spider', 'assets/allacrost_enemy_sprites/spider.png');
    this.game.load.image('stygian_lizard', 'assets/allacrost_enemy_sprites/stygian_lizard.png');
In the create method is where we’ll want to create Sprite objects for these images so that they can exist in the game world. Much like the background images, it’s faster and easier to read if we put all the information that we need to load into an array. This time however, we need more than just the image key. We’re going to want to display the name of the monster on the screen below it, so that the player knows what they are facing. To do this we’ll create an array of objects that has a name property suitable for display, as well as the image key.
var monsterData = [
    {name: 'Aerocephal', image: 'aerocephal'},
    {name: 'Arcana Drake', image: 'arcana_drake'},
    {name: 'Aurum Drakueli', image: 'aurum-drakueli'},
    {name: 'Bat', image: 'bat'},
    {name: 'Daemarbora', image: 'daemarbora'},
    {name: 'Deceleon', image: 'deceleon'},
    {name: 'Demonic Essence', image: 'demonic_essence'},
    {name: 'Dune Crawler', image: 'dune_crawler'},
    {name: 'Green Slime', image: 'green_slime'},
    {name: 'Nagaruda', image: 'nagaruda'},
    {name: 'Rat', image: 'rat'},
    {name: 'Scorpion', image: 'scorpion'},
    {name: 'Skeleton', image: 'skeleton'},
    {name: 'Snake', image: 'snake'},
    {name: 'Spider', image: 'spider'},
    {name: 'Stygian Lizard', image: 'stygian_lizard'}
];
After that, we’ll need to create the actual sprites for them in order to render them in the game world. Time for another group!
this.monsters = this.game.add.group();

var monster;
monsterData.forEach(function(data) {
    // create a sprite for them off screen
    monster = state.monsters.create(1000, state.game.world.centerY, data.image);
    // center anchor
    monster.anchor.setTo(0.5);
    // reference to the database
    monster.details = data;

    //enable input so we can click it!
    monster.inputEnabled = true;
    monster.events.onInputDown.add(state.onClickMonster, state);
});
When it comes to sprites, groups have a special method create that we can use. For other game objects we need to create them using the normal game factories, and add them as children to the group, the create method only works for sprites. It takes the normal sprite parameters; position and image key, but also lets you pass in a flag as to whether or not the sprite “exists”. This parameter is most often used in object pooling, which we’ll cover a bit later. Each sprite we’ll set the anchor to the center, and set a reference to our monsterData item so that we can reference it later (to display the name).
We’re also going to want to be able to click the monsters (it’s a *click*er game after all), we can tell Phaser to register click events by setting inputEnabled to true. Doing so will enable several input events, we’re interested in what happens when we click the mouse button down (or tap it). For that we’ll tell it to use the onClickMonster method of our state, and that it should be called in the context of our state (javascript “this”). We haven’t created that method yet, we’ll do that in a minute.
In this game, we only ever want to face one monster at a time, so we need a reference to the monster that we are currently facing. Another cool feature of a group is that we can let Phaser randomly select one using getRandom() . Then set the position of the monster to roughly the center of the screen, a little off so that we have room for some other things later.
this.currentMonster = this.monsters.getRandom();
this.currentMonster.position.set(this.game.world.centerX + 100, this.game.world.centerY);
Next we can modify our render method so that we can show the name of the monster that we are up against.
render: function() {
    game.debug.text(this.currentMonster.details.name,
        this.game.world.centerX - this.currentMonster.width / 2,
        this.game.world.centerY + this.currentMonster.height / 2);
}
Finally, we need to add that onClickMonster handler so that something happens when we click them. For now, we’ll just change out the monster on each click so that we can test running through our list (epic insta-kill!). Each click we’ll set the currentMonster to another random one, and position it in the center of the screen. We’ll move the other monster off screen so that we can’t see it at the same time.
onClickMonster: function() {
    // reset the currentMonster before we move him
    this.currentMonster.position.set(1000, this.game.world.centerY);
    // now pick the next in the list, and bring him up
    this.currentMonster = this.monsters.getRandom();
    this.currentMonster.position.set(this.game.world.centerX + 100, this.game.world.centerY);
},
Reminder: time to commit your files again!

Clicking For Great Justice
Obviously just clicking to cycle through the monsters isn’t much of a gameplay element. Instead we need to simulate RPG combat by clicking and dealing damage to the monsters. In order to deal damage, we need to know something about our player. The main hero of this game isn’t directly represented by a sprite on the screen, so we will just create a plain javascript object to hold useful information about them. Add this to the bottom of the create phase:
// the main player
this.player = {
    clickDmg: 1,
    gold: 0
};
Also in order to be able to kill the monsters, they need to have some health to damage. Let’s go back to our monster database from before, and add a maxHealth attribute to each one. For now, for the values of maxHealth, I’ve just chosen somewhat arbitrary numbers, by looking at the sprite and just making a few tougher than the others. Later we can get deeper into gameplay and balance out the toughness of the monsters. I also adjusted the spacing so that it looks a little more like a table and is easier to edit.
var monsterData = [
    {name: 'Aerocephal',        image: 'aerocephal',        maxHealth: 10},
    {name: 'Arcana Drake',      image: 'arcana_drake',      maxHealth: 20},
    {name: 'Aurum Drakueli',    image: 'aurum-drakueli',    maxHealth: 30},
    {name: 'Bat',               image: 'bat',               maxHealth: 5},
    {name: 'Daemarbora',        image: 'daemarbora',        maxHealth: 10},
    {name: 'Deceleon',          image: 'deceleon',          maxHealth: 10},
    {name: 'Demonic Essence',   image: 'demonic_essence',   maxHealth: 15},
    {name: 'Dune Crawler',      image: 'dune_crawler',      maxHealth: 8},
    {name: 'Green Slime',       image: 'green_slime',       maxHealth: 3},
    {name: 'Nagaruda',          image: 'nagaruda',          maxHealth: 13},
    {name: 'Rat',               image: 'rat',               maxHealth: 2},
    {name: 'Scorpion',          image: 'scorpion',          maxHealth: 2},
    {name: 'Skeleton',          image: 'skeleton',          maxHealth: 6},
    {name: 'Snake',             image: 'snake',             maxHealth: 4},
    {name: 'Spider',            image: 'spider',            maxHealth: 4},
    {name: 'Stygian Lizard',    image: 'stygian_lizard',    maxHealth: 20}
];
Phaser sprites come with both Health and LifeSpan components built in that provide all of the features that we need in order to get combat working. They provide us with a damage() and heal() method and take into account health and maxHealth in those methods. When you apply damage and the health drops to 0 (or below) it will automatically call kill() and fire the onKilled event. Similarly, there is a revive() method that allows you to bring a monster back from the dead fully healed. When a monster is revived, it fires the onRevived event. We will hook into those events to drop loot and change monsters. Inside the loop that creates the monster sprites, let’s set the health component based on the value in our data array.
// use the built in health component
monster.health = monster.maxHealth = data.maxHealth;

// hook into health and lifecycle events
monster.events.onKilled.add(state.onKilledMonster, state);
monster.events.onRevived.add(state.onRevivedMonster, state);
Next update the onClickMonster method to deal damage to the monster based on the player’s clickDmg attribute. When the monster’s health reaches 0, it will be killed.
onClickMonster: function(monster, pointer) {
    // apply click damage to monster
    this.currentMonster.damage(this.player.clickDmg);
}
Clicking on a monster will do damage, but it’s important to provide feedback to the player that this is happening. No one likes to click things and see nothing happen, it feels broken. Also, I think it’s time to get rid of the debug text and use an actual text object to display the monster’s name and health. Add these 2 Text objects to your create method. Again we’ll create another group so that moving the monster information around is easy. Creating Text objects is relatively straight forward, like most display objects you provide it the position on the screen (or relative to its parent), but instead of an image key, you pass it the string that you want to display. Optionally you can send in font styling data to change how it’s displayed. This font style information is very similar to standard HTML Canvas fonts.
this.monsterInfoUI = this.game.add.group();
this.monsterInfoUI.position.setTo(this.currentMonster.x - 220, this.currentMonster.y + 120);
this.monsterNameText = this.monsterInfoUI.addChild(this.game.add.text(0, 0, this.currentMonster.details.name, {
    font: '48px Arial Black',
    fill: '#fff',
    strokeThickness: 4
}));
this.monsterHealthText = this.monsterInfoUI.addChild(this.game.add.text(0, 80, this.currentMonster.health + ' HP', {
    font: '32px Arial Black',
    fill: '#ff0000',
    strokeThickness: 4
}));
Back in our onClickMonster event, we want to update the text now to reflect the monster’s new health.
// update the health text
this.monsterHealthText.text = this.currentMonster.alive ? this.currentMonster.health + ' HP' : 'DEAD';
When a monster is killed it fires the onKilled event, we want to push it back off screen and then select a new monster and revive them. The revive method optionally takes a health parameter that will set the health of the monster to the value provided. It then sets alive, visible, and exists to true, and then fires the onRevived event. Add the onKilledMonster method to our state now.
onKilledMonster: function(monster) {
    // move the monster off screen again
    monster.position.set(1000, this.game.world.centerY);

    // pick a new monster
    this.currentMonster = this.monsters.getRandom();
    // make sure they are fully healed
    this.currentMonster.revive(this.currentMonster.maxHealth);
},
When a monster is revived, we want to get them into position on the screen, and reset the monster display text to reflect the new monster. After the kill handler, let’s add the onRevivedMonster event handler to our state as well. Here we move the monster to the center area of the screen and update our text objects to reflect the new information.
onRevivedMonster: function(monster) {
    monster.position.set(this.game.world.centerX + 100, this.game.world.centerY);
    // update the text display
    this.monsterNameText.text = monster.details.name;
    this.monsterHealthText.text = monster.health + 'HP';
},
Ok, now we can see what is happening, and that is good. It still doesn’t quite feel exciting enough though, I think we can add more. For every click, let’s display the damage that we’re doing. For that, we’ll want to create a pool of text objects. Each click we need to display the damage number for a short period and then it should disappear. Instead of creating a new text object for each click (which we could do), it’s better to create a bunch up front and just change the properties. The reason is that in almost all programming situations, especially in JavaScript, creating new objects is an expensive operation. Not something that you want to be doing a lot of every frame. Let’s create a pool of about 50 text objects (I think I can do 30 clicks / second so that’s a decent buffer). The following should go in your create method.
this.dmgTextPool = this.add.group();
var dmgText;
for (var d=0; d<50; d++) {
    dmgText = this.add.text(0, 0, '1', {
        font: '64px Arial Black',
        fill: '#fff',
        strokeThickness: 4
    });
    // start out not existing, so we don't draw it yet
    dmgText.exists = false;
    dmgText.tween = game.add.tween(dmgText)
        .to({
            alpha: 0,
            y: 100,
            x: this.game.rnd.integerInRange(100, 700)
        }, 1000, Phaser.Easing.Cubic.Out);

    dmgText.tween.onComplete.add(function(text, tween) {
        text.kill();
    });
    this.dmgTextPool.add(dmgText);
}
As you can see in order to create a pool of damage text objects to use we didn’t have to do anything special. We used the groups that we already know and love. A standard for loop will help us create 50 of them, and we’ll set them all to exists = false so that they don’t render on the screen until we tell them to. Next, we’re going to add another super powerful tool in Phaser’s arsenal, a Tween. A tween allows you to modify various properties of an object over time. It uses one of several mathematical equations to “ease” these values from start to finish and create animation effects. For the damage text, we want it to fly out from where it was clicked in a random direction and also fade out so that by the time that it reaches its destination, it can no longer be seen. In the to method of the tween, we set the final values that we want the alpha, y and x properties of the object to be, the starting values will be the values of the object when the tween begins. The second parameter is the time that it should take to complete the tween, we’ll set it to 1000 (the value is in milliseconds, so 1 second). The final parameter is the Easing equation that we want to use. When a tween animation is completed, an event is fired, we can hook into there and kill() the text object (effectively setting it back to exists = false ).
Now we’ll turn these on so that clicking to do damage is really exciting. Every time we click, we’ll grab the first available dmgText object (i.e. not killed) from the group using getFirstExists(false) , the false tells the group that we want one that doesn’t exist. Then update the text to reflect the current click damage. We need to reset the alpha property from when the tween had adjusted it, and we want to start this one at the spot where the player clicked. Then we’ll start the tween again, and get our animation.
// grab a damage text from the pool to display what happened
var dmgText = this.dmgTextPool.getFirstExists(false);
if (dmgText) {
    dmgText.text = this.player.clickDmg;
    dmgText.reset(pointer.positionDown.x, pointer.positionDown.y);
    dmgText.alpha = 1;
    dmgText.tween.start();
}
Reminder: commit that code!

Phat Lootz
Killing monsters isn’t something that the player does just for sport, they’re in it for the rewards of gold and treasure. We need to drop some loot when the monster dies, let’s add a gold coin to our images loading in the preload method.
this.game.load.image('gold_coin', 'assets/496_RPG_icons/I_GoldCoin.png');
To start with, every monster will drop a single gold coin when it dies. The player will need to click on them to collect them, and so there could be quite a few laying around before they decide to do that. To create a pool of gold coins, again we’ll utilize the group. This time, since we’re creating a pool of sprites, we can use a special method called createMultiple. This method is very similar to the create method in that it only creates sprites, for this one, it takes a new parameter, the number that you want to create. Since we’re not using a for loop this time to create them, we need a way to setup some defaults without having to loop through our newly created group, for that, we have another method called setAll. It takes the property and value and applies that to each object in the group. We also want to register the onInputDown handler, since adding a handler to an event is a method, we use callAll to execute the events.onInputDown.add method on each child of the group.
// create a pool of gold coins
this.coins = this.add.group();
this.coins.createMultiple(50, 'gold_coin', '', false);
this.coins.setAll('inputEnabled', true);
this.coins.setAll('goldValue', 1);
this.coins.callAll('events.onInputDown.add', 'events.onInputDown', this.onClickCoin, this);
Again we need feedback in the UI so that we know that we are collecting gold. Add this text object to the create method.
this.playerGoldText = this.add.text(30, 30, 'Gold: ' + this.player.gold, {
    font: '24px Arial Black',
    fill: '#fff',
    strokeThickness: 4
});
Now we can add our click handler for the coins. When a coin is clicked, the goldValue of the coin is added to the player’s gold. We also have to update the UI so that we can see the change. Finally, we kill the coin so that it disappears back into our pool for reuse.
onClickCoin: function(coin) {
    // give the player gold
    this.player.gold += coin.goldValue;
    // update UI
    this.playerGoldText.text = 'Gold: ' + this.player.gold;
    // remove the coin
    coin.kill();
}
Next we need to add to the onKilledMonster event so that we can actually drop these coins. Much like the dmgText objects, we’ll grab the first available coin and bring it to life positioning it somewhere randomly in the center-ish of the screen. We update the goldValue (even though we’re just setting it to 1 now) so that in the future we can drop different amounts of gold as we progress.
var coin;
// spawn a coin on the ground
coin = this.coins.getFirstExists(false);
coin.reset(this.game.world.centerX + this.game.rnd.integerInRange(-100, 100), this.game.world.centerY);
coin.goldValue = 1;

As I mentioned earlier, the player has to click on the coins in order to collect them. After a few kills, if they don’t do that, the floor will become quite littered with gold. While piles of cash is always fun, eventually we might run out of new coins to spawn from our pool. What we need to do is automatically collect gold for the player after a short time so that the world doesn’t become cluttered.
To accomplish this, Phaser has a Timer object that we can use to create our own custom timed events. If the coin sits there not being clicked for 3 seconds, then we’ll “click” it for them, by firing the same onClickCoin method that we use when they do click it. The timer event takes the duration, the handler, the context that the handler should fire in, and any other additional parameters that should be passed to the handler.
this.game.time.events.add(Phaser.Timer.SECOND * 3, this.onClickCoin, this, coin);
Since we are going to be calling the onClickCoin method when the timer completes in addition to when the coin is clicked, we need to test and make sure that we don’t call it twice. If the player clicks the coin before the timeout, the timeout will still fire, but the gold will already be collected, and the coin already killed. We can add a simple test at the top of the function to make sure that when we collect this coin it is still alive.
if (!coin.alive) {
    return;
}
Reminder: commit the source, save your work!
Upgrades
I’m sure by now you’re tired of doing just 1 point of damage every click, and we’ve got nothing to spend our precious gold on! Time to create some upgrades. The upgrades menu is going to be a box, with some buttons inside that you can click on to buy things. For the background of the upgrades menu, we could use more art from the web, or create an image ourselves in a paint program, but instead we can utilize the HTML5 Canvas to build it for us. Instead of loading an image, Phaser has an object called BitmapData that creates a canvas for us. The result of the canvas can then be used in place of an image on a sprite. Instead of setting the key when it is loaded like with an image, instead we need to manually add it to Phaser’s asset cache. In the preload method we will generate images (colored rectangles) for the background of the upgrades menu and also the buttons.
// build panel for upgrades
var bmd = this.game.add.bitmapData(250, 500);
bmd.ctx.fillStyle = '#9a783d';
bmd.ctx.strokeStyle = '#35371c';
bmd.ctx.lineWidth = 12;
bmd.ctx.fillRect(0, 0, 250, 500);
bmd.ctx.strokeRect(0, 0, 250, 500);
this.game.cache.addBitmapData('upgradePanel', bmd);

var buttonImage = this.game.add.bitmapData(476, 48);
buttonImage.ctx.fillStyle = '#e6dec7';
buttonImage.ctx.strokeStyle = '#35371c';
buttonImage.ctx.lineWidth = 4;
buttonImage.ctx.fillRect(0, 0, 225, 48);
buttonImage.ctx.strokeRect(0, 0, 225, 48);
this.game.cache.addBitmapData('button', buttonImage);
For the upgrades menu, we don’t need something as heavy as a sprite (with all the health and other stuff). Instead for things that are going to be purely user interface objects, it is better to use a Image. An Image object has the same transform information (position, scale, rotation) just not all the extra things that a sprite does. Instead of passing in an image key, we’ll pull the image out of the cache that we put it into earlier. The menu panel will also contain a group for the buttons, that way all of the buttons can follow the menu and be relative to its transforms. Because of the border on the background image, we’ll move the button group in a little bit.
this.upgradePanel = this.game.add.image(10, 70, this.game.cache.getBitmapData('upgradePanel'));
var upgradeButtons = this.upgradePanel.addChild(this.game.add.group());
upgradeButtons.position.setTo(8, 8);
Our first upgrade will be to the click damage so we can start killing faster. Let’s pick an icon from our library and add that to our image load.
this.game.load.image('dagger', 'assets/496_RPG_icons/W_Dagger002.png');Phaser has another object in its bag of tricks, the Button object. A button is a subclass of an Image object that is designed to handle being clicked out of the box. It supports 4 different button states: Out, Over, Down, and Up. You can provide a spritesheet image with different looks for each of these states, it can make the button appear to actually be “pressed” for example, or change color when you hover over top of it. I’ve only generated a single background frame for our buttons for now, it still works fine without the other images. For the button we are going to add the icon, a label for what the upgrade is, and another text to display the gold cost for upgrading.
var button;
button = this.game.add.button(0, 0, this.game.cache.getBitmapData('button'));
button.icon = button.addChild(this.game.add.image(6, 6, 'dagger'));
button.text = button.addChild(this.game.add.text(42, 6, 'Attack: ' + this.player.clickDmg, {font: '16px Arial Black'}));
button.details = {cost: 5};
button.costText = button.addChild(this.game.add.text(42, 24, 'Cost: ' + button.details.cost, {font: '16px Arial Black'}));
button.events.onInputDown.add(this.onUpgradeButtonClick, this);
After creating the button, then add it to the buttons group.
upgradeButtons.addChild(button);
For now our button handler simply needs to test the one button that we have. First we’ll check that we can afford to purchase the upgrade, if we can then we’ll go through with it. We need to adjust the player’s gold from the cost, and update the UI to reflect that change. We also need to improve the player’s clickDmg attribute, and update the text on the button. Now we can spend our hard earned loot to get stronger!
onUpgradeButtonClick: function(button, pointer) {
    if (this.player.gold - button.details.cost >= 0) {
        this.player.gold -= button.details.cost;
        this.playerGoldText.text = 'Gold: ' + this.player.gold;
        this.player.clickDmg++;
        button.text.text = 'Attack: ' + this.player.clickDmg;
    }
}
Now it’s time to add the second type of upgrade, the DPS upgrade. Until now the only way to deal damage to monsters is by directly clicking on them. While this is an important mechanic in our game, it can get tedious after a while. This is the part that makes this type of game fall into the “idle” genre. Players will continue to progress and deal damage to monsters even when they are not actively clicking them.
In order to add a new button, we need to repeat what we have, and change the effect of purchasing the upgrade. Doing this one button at a time will get unruly after a bit, so we want to create a database array of upgrades, just like we have for monsters. We’ll need the icon to display, the name of the upgrade, the level for the number of times that it has been upgraded, the cost in gold to upgrade, and a callback function that we can fire to provide a different effect for each upgrade.
var upgradeButtonsData = [
    {icon: 'dagger', name: 'Attack', level: 1, cost: 5, purchaseHandler: function(button, player) {
        player.clickDmg += 1;
    }},
    {icon: 'swordIcon1', name: 'Auto-Attack', level: 0, cost: 25, purchaseHandler: function(button, player) {
        player.dps += 5;
    }}
];
We need to add the dps property to our player, so that our purchase handler can take effect.
this.player = {
    clickDmg: 1,
    gold: 0,
    dps: 0
};
Now we can loop through our data and create all of our upgrade buttons in bulk. Because the buttons are about 48 pixels high, we’ll separate each one by 50. Instead of hard coding the text strings and icon, they will be populated from the data.
var button;
upgradeButtonsData.forEach(function(buttonData, index) {
    button = state.game.add.button(0, (50 * index), state.game.cache.getBitmapData('button'));
    button.icon = button.addChild(state.game.add.image(6, 6, buttonData.icon));
    button.text = button.addChild(state.game.add.text(42, 6, buttonData.name + ': ' + buttonData.level, {font: '16px Arial Black'}));
    button.details = buttonData;
    button.costText = button.addChild(state.game.add.text(42, 24, 'Cost: ' + buttonData.cost, {font: '16px Arial Black'}));
    button.events.onInputDown.add(state.onUpgradeButtonClick, state);

    upgradeButtons.addChild(button);
});
When we click an upgrade button now we need to increase its level and update the text to reflect the change. Then we’ll execute the purchaseHandler callback in the context of the state, passing the button and player along to the handler.
onUpgradeButtonClick: function(button, pointer) {
    if (this.player.gold - button.details.cost >= 0) {
        this.player.gold -= button.details.cost;
        this.playerGoldText.text = 'Gold: ' + this.player.gold;
        button.details.level++;
        button.text.text = button.details.name + ': ' + button.details.level;
        button.details.purchaseHandler.call(this, button, this.player);
    }
}
Ok, so we’re increasing both attack and dps (damage per second), but we haven’t setup dps to do anything yet. For dps to make sense, if we have 1 dps then after 1 second has passed we do 1 damage. Waiting the full second to apply any damage at all though is too choppy and slow. Instead we’ll update at 100ms (10 times a second). So, in order to apply 1 damage after 1 second, then we need to apply 0.10 damage every 100ms. Similar to the timer event that we used for the gold coins, there are also loop events that will repeat and call the handler at the duration over and over.
// 100ms 10x a second
this.dpsTimer = this.game.time.events.loop(100, this.onDPS, this);
Our dps handler is going to get called every 100ms whether we have upgraded or not. So we check if we have something to do first, if so, then make sure the monster is still alive to apply the damage. Then we’ll damage the monster and update the text to reflect the monster’s health. I don’t really want to display the decimals that might occur on the monster health from doing 10% damage, so we’ll round it for the display (not the actual health).
onDPS: function() {
    if (this.player.dps > 0) {
        if (this.currentMonster && this.currentMonster.alive) {
            var dmg = this.player.dps / 10;
            this.currentMonster.damage(dmg);
            // update the health text
            this.monsterHealthText.text = this.currentMonster.alive ? Math.round(this.currentMonster.health) + ' HP' : 'DEAD';
        }
    }
}
Reminder: don’t forget to commit!
Progression
Killing the same monsters over and over is boring. We need to keep increasing the difficulty so that the players can face a challenge and progress. Let’s add some world level stats to the preload section.
// world progression
this.level = 1;
// how many monsters have we killed during this level
this.levelKills = 0;
// how many monsters are required to advance a level
this.levelKillsRequired = 10;
Each time we kill a monster now, we need to increase the kills stat. We also need to upgrade the monster’s health based on the level. With increased risk, comes increased reward, and we’ll also modify the coin value based on the world level as well. After 10 monsters have been killed, then we can progress to the next level.
onKilledMonster: function(monster) {
    // move the monster off screen again
    monster.position.set(1000, this.game.world.centerY);

    var coin;
    // spawn a coin on the ground
    coin = this.coins.getFirstExists(false);
    coin.reset(this.game.world.centerX + this.game.rnd.integerInRange(-100, 100), this.game.world.centerY);
    coin.goldValue = Math.round(this.level * 1.33);
    this.game.time.events.add(Phaser.Timer.SECOND * 3, this.onClickCoin, this, coin);

    this.levelKills++;

    if (this.levelKills >= this.levelKillsRequired) {
        this.level++;
        this.levelKills = 0;
    }

    // pick a new monster
    this.currentMonster = this.monsters.getRandom();
    // upgrade the monster based on level
    this.currentMonster.maxHealth = Math.ceil(this.currentMonster.details.maxHealth + ((this.level - 1) * 10.6));
    // make sure they are fully healed
    this.currentMonster.revive(this.currentMonster.maxHealth);
}
Since we’ll be getting a lot more money now, we also need to adjust the upgrade prices.
onUpgradeButtonClick: function(button, pointer) {
    // make this a function so that it updates after we buy
    function getAdjustedCost() {
        return Math.ceil(button.details.cost + (button.details.level * 1.46));
    }

    if (this.player.gold - getAdjustedCost() >= 0) {
        this.player.gold -= getAdjustedCost();
        this.playerGoldText.text = 'Gold: ' + this.player.gold;
        button.details.level++;
        button.text.text = button.details.name + ': ' + button.details.level;
        button.costText.text = 'Cost: ' + getAdjustedCost();
        button.details.purchaseHandler.call(this, button, this.player);
    }
}
Finally, we’ll add the level information to the UI so that the player knows how they are doing. By now adding text objects to reflect this information should be old hat to you!
// setup the world progression display
this.levelUI = this.game.add.group();
this.levelUI.position.setTo(this.game.world.centerX, 30);
this.levelText = this.levelUI.addChild(this.game.add.text(0, 0, 'Level: ' + this.level, {
    font: '24px Arial Black',
    fill: '#fff',
    strokeThickness: 4
}));
this.levelKillsText = this.levelUI.addChild(this.game.add.text(0, 30, 'Kills: ' + this.levelKills + '/' + this.levelKillsRequired, {
    font: '24px Arial Black',
    fill: '#fff',
    strokeThickness: 4
}));
We also need to update the level text when it changes inside the onKilledMonster method.
this.levelText.text = 'Level: ' + this.level;
this.levelKillsText.text = 'Kills: ' + this.levelKills + '/' + this.levelKillsRequired;

Reminder: commit commit commit
Finished the basics, what’s next?
What we’ve created here is a complete idle clicker RPG. Well, complete as in it’s playable. There’s still tons left to do in order to get this game turned into something that is really fun. In game development, they say that the last 10% of the work is the last 90% of your time. We’re pretty much 90% done I think :)
Here’s a list of things that would be great to add: (possibly in future tutorials)
- monsters with animation
- sounds & music!
- more upgrades
- critical hits
- boss monsters
- timed boost powers
- different world backgrounds
- achievements
- leader boards
I hope that you have enjoyed this tutorial and making this game!
Please leave comments and questions below, I welcome any feedback and would love to see your games too!